- About the author
- Questions and Issues
- Edit and Contribute
- Introduction
- 1. JavaScript基礎
- 2. Titanium Classic基礎
- 3. イベント駆動型プログラミングの基礎
- 4. WebViewの使い方について学ぶ
- 5. TableViewの使い方について学ぶ
- 6. HTTPClientの使い方を学ぶ
- 7. Titanium Classic応用編
- 8. ソースコードの保守性をあげる工夫
- 9. TableViewを一工夫して利用する
- 10. 手軽に使えて開発効率があがるJavaScriptライブラリの紹介
- 11. 日付処理を便利に行えるMoment.js
- 12. 配列操作を便利に行えるUnderscore.js
- 13. Titanium Classic環境からAlloyに移行する
- 14. はじめてのAlloy
- Generated using GitBook
CommonJSについて
TableViewの使い方について学ぶのサンプルデータを表示させるのサンプルコードをベースにCommonJSスタイルの書き方について解説していきます。
Resources直下に、style.jsというファイルを新規に作成します。作成後は以下の様なフォルダ構成になるかと思います。
├── CHANGELOG.txt
├── LICENSE
├── LICENSE.txt
├── README
├── Resources
│   ├── KS_nav_ui.png
│   ├── KS_nav_views.png
│   ├── app.js
│   ├── iphone
│   └── style.js
├── build
│   └── iphone
├── manifest
└── tiapp.xml
style.js の中身
style.js を以下のように記述することで、UI要素の幅、高さ、色などの値の設定箇けをapp.jsから切り離すことが出来ます。
exports.mainTable = {
    "width": Ti.UI.FULL,
    "height": Ti.UI.FULL,
    "backgroundColor": "#fff",
    "separatorColor": "#ccc",
    "left": 0,
    "top": 0
};
exports.row = {
    "width": Ti.UI.FULL,
    "height":60,
    "borderWidth": 0,
    "className":"entry"
};

exports.textLabel = {
    "width":250,
    "height":50,
    "top":5,
    "left":60,
    "color":"#222",
    "font":{
        "fontSize":16,
        "fontWeight":"bold"
    }
};
app.js を編集する
UI要素を生成する部分はstyle.jsにて行うようにしたことでapp.jsの方を編集する必要が出てきます。
具体的には
- app.js内で処理していたUI要素を生成する部分のコードは削除
- style.jsを読み込みこちらで設定した値をそれぞれのTi.UI要素に適用
という流れになります。
編集した結果以下の様なコードになります。
var sample,file,body,style,mainTable,win,rows,_i,_len;
sample = Ti.Filesystem.getFile(Ti.Filesystem.resourcesDirectory, "sample.json");
file = sample.read().toString();
body = JSON.parse(file);
style = require("style");
mainTable = Ti.UI.createTableView(style.mainTable);
win = Ti.UI.createWindow({
  title:'QiitaViewer'
});
rows = [];
for (_i = 0, _len = body.length; _i < _len; _i++) {
  row = Ti.UI.createTableViewRow(style.row);
  textLabel = Ti.UI.createLabel(style.textLabel);
  textLabel.text = body[_i].title;
  row.add(textLabel);
  rows.push(row);
}
mainTable.setData(rows);
win.add(mainTable);
win.open();
ソースコードの解説
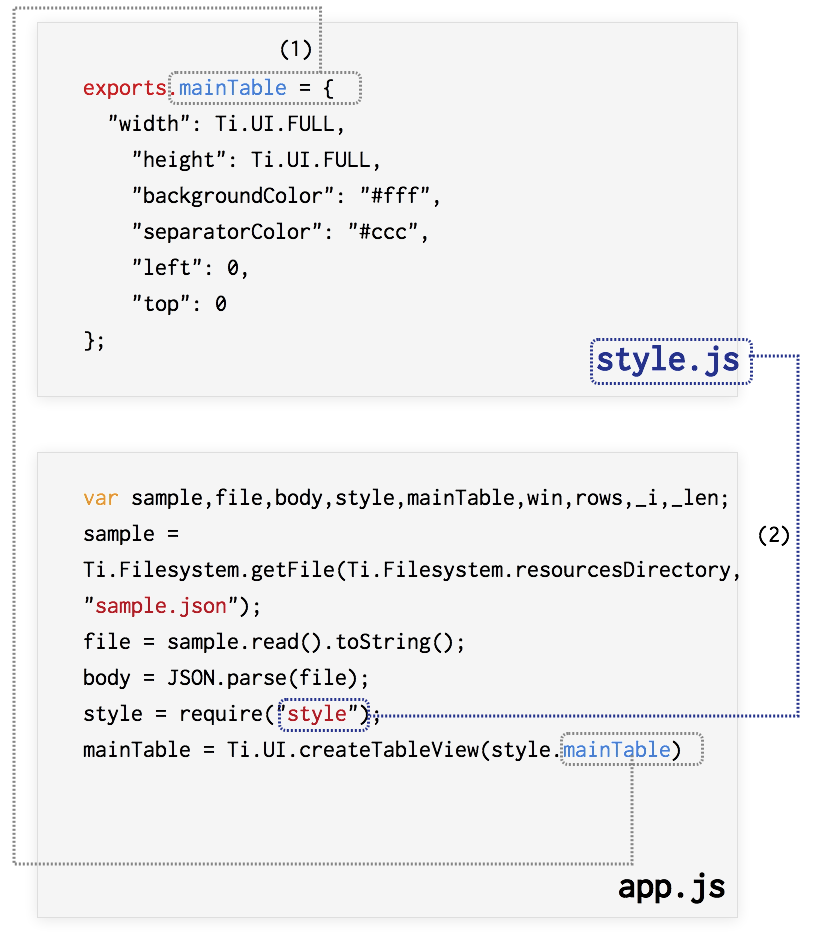
style.jsとapp.jsの対応関係を絵にまとめつつソースコードの解説をします。

- style.jsには、exports.オブジェクト名 = {} という形式で、UI要素に指定したい項目名を設定します。オブジェクト名は任意の名前でOKですが、対応関係がわかるようにして置いたほうがソースコードとして理解しやすくなるため名前を統一することをおすすめします。
- 呼び出す側 app.jsからstyle.jsを読み込む時には、require()という関数を利用して任意の変数に格納します。
なおstyle.jsでは、
- exports.mainTable:app.jsでは変数mainTableとして格納されてるTableViewに対する設定値
- exports.row:app.jsでは変数rowとして格納されてるTableViewRowに対する設定値
- exports.textLabel:app.jsでは変数textLabelとして格納されてるTextLabelに対する設定値
という形になります。
このように設定情報だけを別のファイルにするだけでも比較的ソースコードの見通しが良くなりますが、次の項でもう少し踏み込んだ形でCommonJSスタイルの書き方を紹介します。